文章目录
- 一、Netty线程模型简介
- 二、Netty线程模型源码分析
- 1. 服务端源码分析
一、Netty线程模型简介
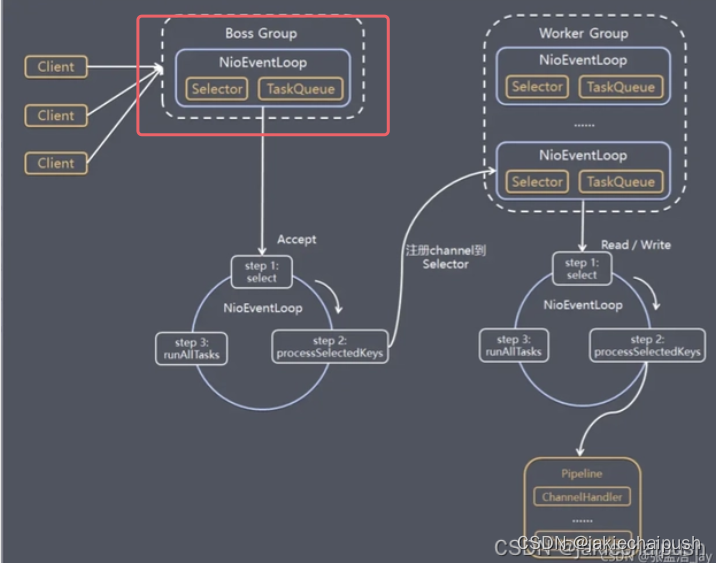
Netty的线程模型图如下所示:

具体细节看这篇博客
二、Netty线程模型源码分析
1. 服务端源码分析
首先我们在写Netty服务端程序的时候最开始是下面两句代码:
//指定EvenLoopGroup中EvenLoop(线程数)的数量
EvenLoopGroup bossGroup = new NioEventLoopGroup(1);
//使用默认数量
EvenLoopGroup bossGroup = new NioEventLoopGroup();
我们进入默认构造方法:
//如果我们不传递参数,默认数就是0
 public NioEventLoopGroup() {
        this(0);
    }

protected MultithreadEventLoopGroup(int nThreads, ThreadFactory threadFactory, Object... args) {
        super(nThreads == 0 ? DEFAULT_EVENT_LOOP_THREADS : nThreads, threadFactory, args);
    }
上面代码最核心的是super(nThreads == 0 ? DEFAULT_EVENT_LOOP_THREADS : nThreads, threadFactory, args);,这里面它判断参数传入的线程数nThreads是否为0,如果是0线程数就是默认的DEFAULT_EVENT_LOOP_THREADS,我们看看这个默认值是怎么初始化的:
private static final int DEFAULT_EVENT_LOOP_THREADS = Math.max(1, SystemPropertyUtil.getInt("io.netty.eventLoopThreads", NettyRuntime.availableProcessors() * 2));
上面代码的逻辑就是1和SystemPropertyUtil.getInt的返回值进行比较,这个方法会首先判断系统参数"io.netty.eventLoopThreads"是否配置了,配置了就用该系统参数的值,没有配置就使用NettyRuntime.availableProcessors() * 2也就是该机器核数的2倍。上面代码就设置了NioEventLoopGroup中线程数的数量。我们继续进入super方法。
 protected MultithreadEventExecutorGroup(int nThreads, Executor executor, EventExecutorChooserFactory chooserFactory, Object... args) {
        this.terminatedChildren = new AtomicInteger();
        this.terminationFuture = new DefaultPromise(GlobalEventExecutor.INSTANCE);
        //如果参数nThreads是0,就抛出异常(前面我们已经讲解了源码中这个参数是如何设置的)
        if (nThreads <= 0) {
            throw new IllegalArgumentException(String.format("nThreads: %d (expected: > 0)", nThreads));
        } else {
        	//我们知道在前面的代码中我们并没有指定线程池,这个if就是帮我们创建线程池
            if (executor == null) {
                executor = new ThreadPerTaskExecutor(this.newDefaultThreadFactory());
            }
			//这里又指定了一个线程池数组,然后数量就是参数nThreads(线程池数组)
            this.children = new EventExecutor[nThreads];

            int j;
            //遍历线程池数组中每一个线程池
            for(int i = 0; i < nThreads; ++i) {
                boolean success = false;
                boolean var18 = false;

                try {
                    var18 = true;
                    //给线程池赋值
                    this.children[i] = this.newChild((Executor)executor, args);
                    success = true;
                    var18 = false;
                } catch (Exception var19) {
                    throw new IllegalStateException("failed to create a child event loop", var19);
                } finally {
                    if (var18) {
                        if (!success) {
                            int j;
                            for(j = 0; j < i; ++j) {
                                this.children[j].shutdownGracefully();
                            }

                            for(j = 0; j < i; ++j) {
                                EventExecutor e = this.children[j];

                                try {
                                    while(!e.isTerminated()) {
                                        e.awaitTermination(2147483647L, TimeUnit.SECONDS);
                                    }
                                } catch (InterruptedException var20) {
                                    Thread.currentThread().interrupt();
                                    break;
                                }
                            }
                        }

                    }
                }

                if (!success) {
                    for(j = 0; j < i; ++j) {
                        this.children[j].shutdownGracefully();
                    }

                    for(j = 0; j < i; ++j) {
                        EventExecutor e = this.children[j];

                        try {
                            while(!e.isTerminated()) {
                                e.awaitTermination(2147483647L, TimeUnit.SECONDS);
                            }
                        } catch (InterruptedException var22) {
                            Thread.currentThread().interrupt();
                            break;
                        }
                    }
                }
            }

            this.chooser = chooserFactory.newChooser(this.children);
            FutureListener<Object> terminationListener = new FutureListener<Object>() {
                public void operationComplete(Future<Object> future) throws Exception {
                    if (MultithreadEventExecutorGroup.this.terminatedChildren.incrementAndGet() == MultithreadEventExecutorGroup.this.children.length) {
                        MultithreadEventExecutorGroup.this.terminationFuture.setSuccess((Object)null);
                    }

                }
            };
            EventExecutor[] var24 = this.children;
            j = var24.length;

            for(int var26 = 0; var26 < j; ++var26) {
                EventExecutor e = var24[var26];
                e.terminationFuture().addListener(terminationListener);
            }

            Set<EventExecutor> childrenSet = new LinkedHashSet(this.children.length);
            Collections.addAll(childrenSet, this.children);
            this.readonlyChildren = Collections.unmodifiableSet(childrenSet);
        }
    }
首先我们先看上面代码的第一个核心代码:
 this.children[i] = this.newChild((Executor)executor, args);

//NIOEventLoopGroup的实现
 protected EventLoop newChild(Executor executor, Object... args) throws Exception {
        EventLoopTaskQueueFactory queueFactory = args.length == 4 ? (EventLoopTaskQueueFactory)args[3] : null;
        return new NioEventLoop(this, executor, (SelectorProvider)args[0], ((SelectStrategyFactory)args[1]).newSelectStrategy(), (RejectedExecutionHandler)args[2], queueFactory);
    }
从返回值我们看到类型是NioEventLoop,也就是说 this.children[i]这个线程池数组中放的是NioEventLoop对象,这也对应了线程模型图中的下面红圈部分:
我们继续进入NioEventLoop的构造函数:
 NioEventLoop(NioEventLoopGroup parent, Executor executor, SelectorProvider selectorProvider, SelectStrategy strategy, RejectedExecutionHandler rejectedExecutionHandler, EventLoopTaskQueueFactory queueFactory) {
        super(parent, executor, false, newTaskQueue(queueFactory), newTaskQueue(queueFactory), rejectedExecutionHandler);
        if (selectorProvider == null) {
            throw new NullPointerException("selectorProvider");
        } else if (strategy == null) {
            throw new NullPointerException("selectStrategy");
        } else {
            this.provider = selectorProvider;
            SelectorTuple selectorTuple = this.openSelector();
            this.selector = selectorTuple.selector;
            this.unwrappedSelector = selectorTuple.unwrappedSelector;
            this.selectStrategy = strategy;
        }
    }
上面代码首先第一句是调用父类的构造方法:
  super(parent, executor, false, newTaskQueue(queueFactory), newTaskQueue(queueFactory), rejectedExecutionHandler);

 protected SingleThreadEventLoop(EventLoopGroup parent, Executor executor, boolean addTaskWakesUp, Queue<Runnable> taskQueue, Queue<Runnable> tailTaskQueue, RejectedExecutionHandler rejectedExecutionHandler) {
        super(parent, executor, addTaskWakesUp, taskQueue, rejectedExecutionHandler);
        this.tailTasks = (Queue)ObjectUtil.checkNotNull(tailTaskQueue, "tailTaskQueue");
    }


    protected SingleThreadEventExecutor(EventExecutorGroup parent, Executor executor, boolean addTaskWakesUp, int maxPendingTasks, RejectedExecutionHandler rejectedHandler) {
        super(parent);
        this.threadLock = new CountDownLatch(1);
        this.shutdownHooks = new LinkedHashSet();
        this.state = 1;
        this.terminationFuture = new DefaultPromise(GlobalEventExecutor.INSTANCE);
        this.addTaskWakesUp = addTaskWakesUp;
        this.maxPendingTasks = Math.max(16, maxPendingTasks);
        this.executor = ThreadExecutorMap.apply(executor, this);
        //这个taskQueue的底层本质上就是一个LinkedBlockingQueue,阻塞队列
        this.taskQueue = this.newTaskQueue(this.maxPendingTasks);
        this.rejectedExecutionHandler = (RejectedExecutionHandler)ObjectUtil.checkNotNull(rejectedHandler, "rejectedHandler");
    }
继续回到NioEventLoop构造函数,然后是下面代码:
   this.provider = selectorProvider;
   SelectorTuple selectorTuple = this.openSelector();
   this.selector = selectorTuple.selector;
上面代码逻辑其实在Java的NIO中也有,就是获取一个Selector,然后赋值给了this.selector这个Ni oEventLoop成员变量。到这里NioEventLoop的两个核心组件Selector和TaskQueue就找到源头了,我们继续回到MultithreadEventExecutorGroup方法:
this.children[i] = this.newChild((Executor)executor, args);
通过上面分析,我们知道了this.children[I]这个线程池数组里面封装的就是一个一个的NioEventLoop,然后NioEventLoop底层就是一个Selector一个TaskQueue,也正是对应了线程模型中的第一个部分,然后newChild((Executor)executor, args);这个方法的第一个参数就是executor它是我们前面创建的一个ThreadPerTaskExecutor线程池,这里先不介绍这个线程池。到此NioEventLoopGroup创建的大致的底层逻辑就分析完了,当然还有很多细节代码没有分析,这里就和后面具体的业务代码进行分析,在NioEventLoopGroup创建完成后,主程序就开始执行下面代码:
//指定EvenLoopGroup中EvenLoop(线程数)的数量
EvenLoopGroup bossGroup = new NioEventLoopGroup(1);
//使用默认数量
EvenLoopGroup bossGroup = new NioEventLoopGroup();
try{
	//创建服务器端的启动对象
	ServerBootStrap bootstrap =new ServerBootStrap();
}
点进ServerBootStrap的构造函数:
public ServerBootstrap() {
    }
可以发现它的构造方法中什么也没干,也就没什么逻辑分析了,继续执行主业务代码:
//指定EvenLoopGroup中EvenLoop(线程数)的数量
EvenLoopGroup bossGroup = new NioEventLoopGroup(1);
//使用默认数量
EvenLoopGroup bossGroup = new NioEventLoopGroup();
try{
	//创建服务器端的启动对象
	ServerBootStrap bootstrap =new ServerBootStrap();
	//使用链式编程来配置参数
	bootstrap.group(bossGroup,workerGroup)//设置两个线程组
}
ServerBootStrap的参数的配置通常使用链式编程的方式进行配置,首先看第一个配置.group(bossGroup,childGroup),从形式上看就是将我们前面定义的两个NiojEventLoopGroup设置进去了,我们进去源码看看:
public ServerBootstrap group(EventLoopGroup parentGroup, EventLoopGroup childGroup) {
        super.group(parentGroup);
        ObjectUtil.checkNotNull(childGroup, "childGroup");
        if (this.childGroup != null) {
            throw new IllegalStateException("childGroup set already");
        } else {
            this.childGroup = childGroup;
            return this;
        }
    }

 public B group(EventLoopGroup group) {
        ObjectUtil.checkNotNull(group, "group");
        if (this.group != null) {
            throw new IllegalStateException("group set already");
        } else {
            this.group = group;
            return this.self();
        }
    }
从参数我们可以看出bossGroup对应的是parentGroup(父线程组),workerGroup对应的是childGroup(子线程组),首先调用了 super.group(parentGroup);即父类的group方法,父类的group方法主要就是将bossGroup赋值给了this.group 成员变量,然后childGroup赋值给子类的this.childGroup成员变量,然后返回this当前对象,达到了链式调用的条件。上面代码本质上就是将我们创建的NioEventLoopGroup对象保存到了ServerBootStrap对象中。到此group(bossGroup,workerGroup)方法就执行完了,继续回到主业务代码:
//指定EvenLoopGroup中EvenLoop(线程数)的数量
EvenLoopGroup bossGroup = new NioEventLoopGroup(1);
//使用默认数量
EvenLoopGroup bossGroup = new NioEventLoopGroup();
try{
	//创建服务器端的启动对象
	ServerBootStrap bootstrap =new ServerBootStrap();
	//使用链式编程来配置参数
	bootstrap.group(bossGroup,workerGroup)//设置两个线程组
			 .channel(NioServerSocketChannel.class) //使用NioServerSocketChannel作为服务器通道的实现
}
我们进入channel(NioServerSocketChannel.class) 方法:
   public B channel(Class<? extends C> channelClass) {
        return this.channelFactory((io.netty.channel.ChannelFactory)(new ReflectiveChannelFactory((Class)ObjectUtil.checkNotNull(channelClass, "channelClass"))));
    }
按照代码逻辑就是调用了this.channelFactory函数,然后该函数的参数就是new ReflectiveChannelFactory((Class)ObjectUtil.checkNotNull(channelClass, "channelClass"))根据我们传入的channelClass类型创建了一个ReflectiveChannelFactory我们进入内部代码看看:
public ReflectiveChannelFactory(Class<? extends T> clazz) {
        ObjectUtil.checkNotNull(clazz, "clazz");

        try {
        	//将我们传入的channel类型的构造函数暂存了起来
            this.constructor = clazz.getConstructor();
        } catch (NoSuchMethodException var3) {
            throw new IllegalArgumentException("Class " + StringUtil.simpleClassName(clazz) + " does not have a public non-arg constructor", var3);
        }
    }
上面方法就是将我们的指定的NioServerSocketChannel的构造函数保存到了ReflectiveChannelFactory对象中了,然后执行this.channelFactory方法,我们进入该方法:
  public B channelFactory(ChannelFactory<? extends C> channelFactory) {
        ObjectUtil.checkNotNull(channelFactory, "channelFactory");
        if (this.channelFactory != null) {
            throw new IllegalStateException("channelFactory set already");
        } else {
        	//这里就是将前面创建的channel工厂对象保存了起来
            this.channelFactory = channelFactory;
            return this.self();
        }
    }
上面代码就是将前面我们创建的ReflectiveChannelFactory保存到了 this.channelFactory这个成员变量中。然后回到主业务代码:
//指定EvenLoopGroup中EvenLoop(线程数)的数量
EvenLoopGroup bossGroup = new NioEventLoopGroup(1);
//使用默认数量
EvenLoopGroup bossGroup = new NioEventLoopGroup();
try{
	//创建服务器端的启动对象
	ServerBootStrap bootstrap =new ServerBootStrap();
	//使用链式编程来配置参数
	bootstrap.group(bossGroup,workerGroup)//设置两个线程组
			 .channel(NioServerSocketChannel.class) //使用NioServerSocketChannel作为服务器通道的实现
			 .option(ChannelOption.SO_BACKLOG,1024)//初始化服务器的连接队列大小,服务端处理客户端的连接是顺序处理的,所以同一事件只能处理一个客户端连接。多个客户端同时来的时候,服务端将不能处理的连接请求放在队列中等待
}
我们进入.option方法:
public <T> B option(ChannelOption<T> option, T value) {
        ObjectUtil.checkNotNull(option, "option");
        if (value == null) {
            this.options.remove(option);
        } else {
            this.options.put(option, value);
        }

        return this.self();
    }
//BootStrap中的成员变量中的一个map集合(存储netty程序员启动时需要设置的一些属性)
private final Map<ChannelOption<?>, Object> options = new ConcurrentHashMap();
option方法本质上就是用来设置Netty启动时的一些属性的,例如ChannelOption.SO_BACKLOG就是其中之一,设置的方式就是放到了ServerBootStrap中的一个线程安全集合options中。这些参数的作用后面再分析,然后继续回到业务代码:
//指定EvenLoopGroup中EvenLoop(线程数)的数量
EvenLoopGroup bossGroup = new NioEventLoopGroup(1);
//使用默认数量
EvenLoopGroup bossGroup = new NioEventLoopGroup();
try{
	//创建服务器端的启动对象
	ServerBootStrap bootstrap =new ServerBootStrap();
	//使用链式编程来配置参数
	bootstrap.group(bossGroup,workerGroup)//设置两个线程组
			 .channel(NioServerSocketChannel.class) //使用NioServerSocketChannel作为服务器通道的实现
			 .option(ChannelOption.SO_BACKLOG,1024)//初始化服务器的连接队列大小,服务端处理客户端的连接是顺序处理的,所以同一事件只能处理一个客户端连接。多个客户端同时来的时候,服务端将不能处理的连接请求放在队列中等待
			 .childHandler((ChannelInitializer)(ch)->{
			 	//对workerGroup的SocketChannel设置处理器
			 	ch.pipeline().addLast(new NettyServerHandler());
			 	});
}
然后就是调用 .childHandler设置channel的处理器链了,这也是最核心的部分了。我们进入该方法:
    public ServerBootstrap childHandler(ChannelHandler childHandler) {
        this.childHandler = (ChannelHandler)ObjectUtil.checkNotNull(childHandler, "childHandler");
        return this;
    }
上面代码就是将ChannelHandler对象赋值给ServerBootStrap的 this.childHandler属性。
看到这里我们不难发现整个链式调用的过程其实都是在给启动器
ServerBootStrap对象的成员变量进行赋值。
到此ServerBootStrap对象就创建完成了,我们继续进行业务代码:
//指定EvenLoopGroup中EvenLoop(线程数)的数量
EvenLoopGroup bossGroup = new NioEventLoopGroup(1);
//使用默认数量
EvenLoopGroup bossGroup = new NioEventLoopGroup();
try{
	//创建服务器端的启动对象
	ServerBootStrap bootstrap =new ServerBootStrap();
	//使用链式编程来配置参数
	bootstrap.group(bossGroup,workerGroup)//设置两个线程组
			 .channel(NioServerSocketChannel.class) //使用NioServerSocketChannel作为服务器通道的实现
			 .option(ChannelOption.SO_BACKLOG,1024)//初始化服务器的连接队列大小,服务端处理客户端的连接是顺序处理的,所以同一事件只能处理一个客户端连接。多个客户端同时来的时候,服务端将不能处理的连接请求放在队列中等待
			 .childHandler((ChannelInitializer)(ch)->{
			 	//对workerGroup的SocketChannel设置处理器
			 	ch.pipeline().addLast(new NettyServerHandler());
			 	});
	//绑定一个端口并且同步,生成了一个ChannelFuture异步对象,通过isDone()等方法可以判断异步事件的执行情况
	//启动服务器并绑定端口,bind是异步操作,sync方法是等待异步操作执行完毕(阻塞的)
	ChannelFuture cf=bootstrap.bind(9000).sync();
}
上面的代码是非常重要的一句代码,这里我们详细分析一下,我们进入bind方法:
public ChannelFuture bind(int inetPort) {
        return this.bind(new InetSocketAddress(inetPort));
    }
上面代码首先将我们传入的端口号9000封装为一个InetSocketAddress对象,然后调用ServerBootStrap的bind方法,我们进入该bind方法:
public ChannelFuture bind(SocketAddress localAddress) {
        this.validate();
        return this.doBind((SocketAddress)ObjectUtil.checkNotNull(localAddress, "localAddress"));
    }
核心方法是this.doBind方法,然后参数就是我们前面传入的端口号,继续进入this.doBind方法:
private ChannelFuture doBind(final SocketAddress localAddress) {
        final ChannelFuture regFuture = this.initAndRegister();
        final Channel channel = regFuture.channel();
        if (regFuture.cause() != null) {
            return regFuture;
        } else if (regFuture.isDone()) {
            ChannelPromise promise = channel.newPromise();
            doBind0(regFuture, channel, localAddress, promise);
            return promise;
        } else {
            final PendingRegistrationPromise promise = new PendingRegistrationPromise(channel);
            regFuture.addListener(new ChannelFutureListener() {
                public void operationComplete(ChannelFuture future) throws Exception {
                    Throwable cause = future.cause();
                    if (cause != null) {
                        promise.setFailure(cause);
                    } else {
                        promise.registered();
                        AbstractBootstrap.doBind0(regFuture, channel, localAddress, promise);
                    }

                }
            });
            return promise;
        }
    }
我们重点分析上面代码,首先第一句核心代码是 final ChannelFuture regFuture = this.initAndRegister();,它调用了this.initAndRegister方法获取了一个ChannelFuture对象,我们看看initAndRegister方法:
final ChannelFuture initAndRegister() {
        Channel channel = null;

        try {
            channel = this.channelFactory.newChannel();
            this.init(channel);
        } catch (Throwable var3) {
            if (channel != null) {
                channel.unsafe().closeForcibly();
                return (new DefaultChannelPromise(channel, GlobalEventExecutor.INSTANCE)).setFailure(var3);
            }

            return (new DefaultChannelPromise(new FailedChannel(), GlobalEventExecutor.INSTANCE)).setFailure(var3);
        }

        ChannelFuture regFuture = this.config().group().register(channel);
        if (regFuture.cause() != null) {
            if (channel.isRegistered()) {
                channel.close();
            } else {
                channel.unsafe().closeForcibly();
            }
        }

        return regFuture;
    }
channel = this.channelFactory.newChannel();,前面在分析ServerBootStrap对象构建过程中,分析了.channel(NioServerSocketChannel.class)底层就保存了一个channel工厂对象,这里就将前面创建的工厂对象拿出来创建了一个channel对象的实例,我们进入newChannel()方法:
public T newChannel() {
        try {
            return (Channel)this.constructor.newInstance();
        } catch (Throwable var2) {
            throw new ChannelException("Unable to create Channel from class " + this.constructor.getDeclaringClass(), var2);
        }
    }
channel工厂对象内部保存的其实就是我们传入的NioServerSocketChannel.class类型的构造函数,这里就用保存的构造函数使用反射创建了一个Channel实例。这里调用的是NioServerSocketChannel.class的空构造方法,我们进入该构造方法,看它创建了一些什么东西:
public NioServerSocketChannel() {
        this(newSocket(DEFAULT_SELECTOR_PROVIDER));
    }
然后这里调用了newSocket(DEFAULT_SELECTOR_PROVIDER)方法,我们进入该方法:
 private static java.nio.channels.ServerSocketChannel newSocket(SelectorProvider provider) {
        try {
            return provider.openServerSocketChannel();
        } catch (IOException var2) {
            throw new ChannelException("Failed to open a server socket.", var2);
        }
    }
provider.openServerSocketChannel();这句代码和NIO底层的ServerSocketChannel类的open方法的代码一模一样,这句代码的作用就是,从返回值也可以看出是java.nio.channels.ServerSocketChannel,创建了一个ServerSocketChannel对象。newSocket执行完毕后,看this调用的是哪一个构造函数:
public NioServerSocketChannel(java.nio.channels.ServerSocketChannel channel) {
        super((Channel)null, channel, 16);
        this.config = new NioServerSocketChannelConfig(this, this.javaChannel().socket());
    }
首先我们进入super方法,参数就是前面newSocket创建的java.nio.channels.ServerSocketChannel对象,以及一个16,这个16就代表NIO中Selectionkey对象的OP_ACCEPT事件public static final int OP_ACCEPT=1<<4;:
 protected AbstractNioChannel(Channel parent, SelectableChannel ch, int readInterestOp) {
        super(parent);
        //记录serverSocketChannel
        this.ch = ch;
        //记录serverSocketChannel感兴趣的事件
        this.readInterestOp = readInterestOp;

        try {
       		//设置channel为非阻塞模式
            ch.configureBlocking(false);
        } catch (IOException var7) {
            try {
                ch.close();
            } catch (IOException var6) {
                logger.warn("Failed to close a partially initialized socket.", var6);
            }

            throw new ChannelException("Failed to enter non-blocking mode.", var7);
        }
    }
我们继续进入super方法:
protected AbstractChannel(Channel parent) {
        this.parent = parent;
        this.id = this.newId();
        this.unsafe = this.newUnsafe();
        this.pipeline = this.newChannelPipeline();
    }
上面代码核心就是创建了this.pipeline对象,我们进入newChannelPipeline方法,看看底层是如何创建Pipeline的:
 protected DefaultChannelPipeline newChannelPipeline() {
        return new DefaultChannelPipeline(this);
    }


    protected DefaultChannelPipeline(Channel channel) {
        this.channel = (Channel)ObjectUtil.checkNotNull(channel, "channel");
        this.succeededFuture = new SucceededChannelFuture(channel, (EventExecutor)null);
        this.voidPromise = new VoidChannelPromise(channel, true);
        //默认放了一个尾节点
        this.tail = new TailContext(this);
        //默认放了一个头节点
        this.head = new HeadContext(this);
        //说明是一个双向链表
        this.head.next = this.tail;
        this.tail.prev = this.head;
    }
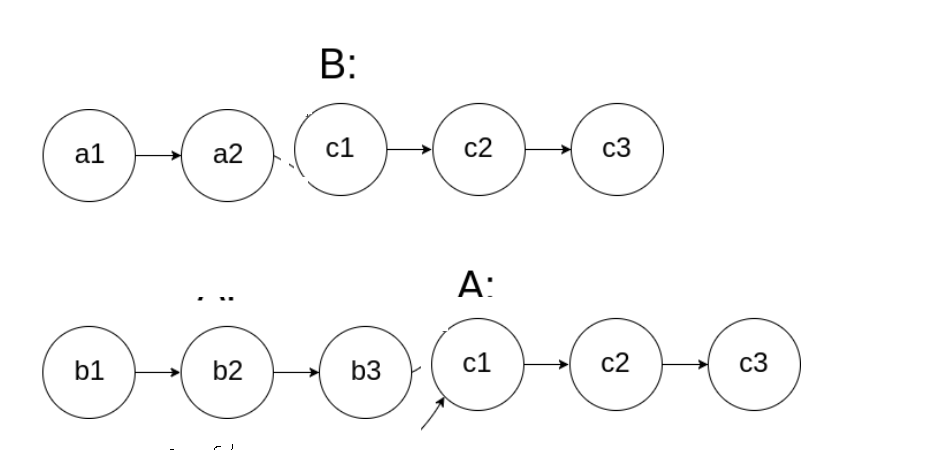
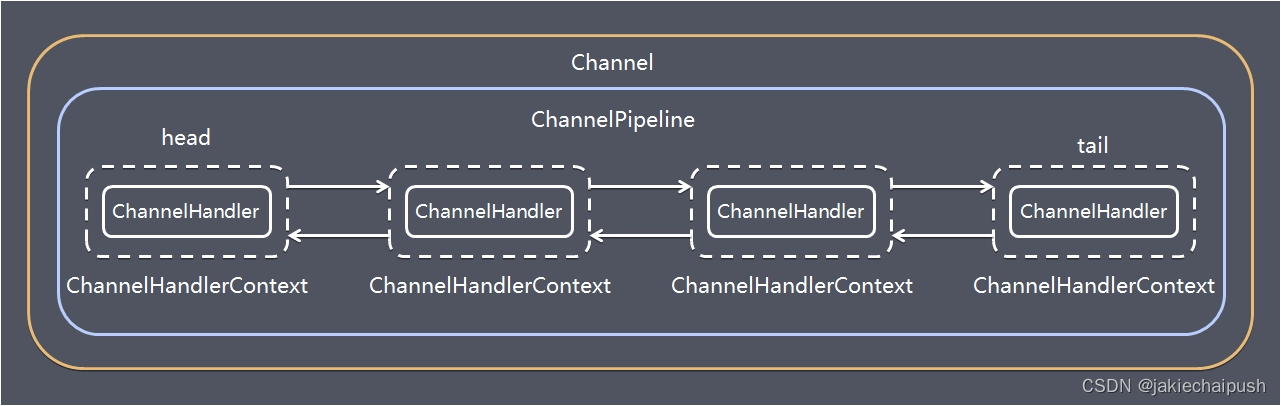
从上面的代码我们就可以看出了ChannelPipeline的底层结构了:
到此channelFactory.newChannel底层的逻辑我们就看完了,其实就是创建了一个ServerSocketChannel,然后构建了pipeline对象,我们继续回到initAndRegister()方法:
final ChannelFuture initAndRegister() {
        Channel channel = null;

        try {
            channel = this.channelFactory.newChannel();
            this.init(channel);
        } catch (Throwable var3) {
            if (channel != null) {
                channel.unsafe().closeForcibly();
                return (new DefaultChannelPromise(channel, GlobalEventExecutor.INSTANCE)).setFailure(var3);
            }

            return (new DefaultChannelPromise(new FailedChannel(), GlobalEventExecutor.INSTANCE)).setFailure(var3);
        }

        ChannelFuture regFuture = this.config().group().register(channel);
        if (regFuture.cause() != null) {
            if (channel.isRegistered()) {
                channel.close();
            } else {
                channel.unsafe().closeForcibly();
            }
        }

        return regFuture;
    }
然后就行调用 this.init(channel);方法,我们进入该方法:
//参数就是前面创建的NioServerSocketChannel对象
void init(Channel channel) {
        setChannelOptions(channel, (Map.Entry[])this.options0().entrySet().toArray(newOptionArray(0)), logger);
        setAttributes(channel, (Map.Entry[])this.attrs0().entrySet().toArray(newAttrArray(0)));
        ChannelPipeline p = channel.pipeline();
        final EventLoopGroup currentChildGroup = this.childGroup;
        final ChannelHandler currentChildHandler = this.childHandler;
        final Map.Entry<ChannelOption<?>, Object>[] currentChildOptions = (Map.Entry[])this.childOptions.entrySet().toArray(newOptionArray(0));
        final Map.Entry<AttributeKey<?>, Object>[] currentChildAttrs = (Map.Entry[])this.childAttrs.entrySet().toArray(newAttrArray(0));
        p.addLast(new ChannelHandler[]{new ChannelInitializer<Channel>() {
            public void initChannel(final Channel ch) {
            //拿到前面创建的管道
                final ChannelPipeline pipeline = ch.pipeline();
                ChannelHandler handler = ServerBootstrap.this.config.handler();
                if (handler != null) {
                    pipeline.addLast(new ChannelHandler[]{handler});
                }

                ch.eventLoop().execute(new Runnable() {
                    public void run() {
                        pipeline.addLast(new ChannelHandler[]{new ServerBootstrapAcceptor(ch, currentChildGroup, currentChildHandler, currentChildOptions, currentChildAttrs)});
                    }
                });
            }
        }});
    }
上面代码最核心的一部分是下面这一段代码:
 p.addLast(new ChannelHandler[]{new ChannelInitializer<Channel>() {
            public void initChannel(final Channel ch) {
                final ChannelPipeline pipeline = ch.pipeline();
                ChannelHandler handler = ServerBootstrap.this.config.handler();
                if (handler != null) {
                    pipeline.addLast(new ChannelHandler[]{handler});
                }

                ch.eventLoop().execute(new Runnable() {
                    public void run() {
                        pipeline.addLast(new ChannelHandler[]{new ServerBootstrapAcceptor(ch, currentChildGroup, currentChildHandler, currentChildOptions, currentChildAttrs)});
                    }
                });
            }
        }});
使用netty的都知道这个就是向管道(ServerSocketChannel)中加入了一个处理器handler,这个handler的作用我们后面再分析,现在pipeline里面有三个handler了。到此init方法执行完毕了,继续回到initAndRegister方法。
final ChannelFuture initAndRegister() {
        Channel channel = null;

        try {
            channel = this.channelFactory.newChannel();
            this.init(channel);
        } catch (Throwable var3) {
            if (channel != null) {
                channel.unsafe().closeForcibly();
                return (new DefaultChannelPromise(channel, GlobalEventExecutor.INSTANCE)).setFailure(var3);
            }

            return (new DefaultChannelPromise(new FailedChannel(), GlobalEventExecutor.INSTANCE)).setFailure(var3);
        }

        ChannelFuture regFuture = this.config().group().register(channel);
        if (regFuture.cause() != null) {
            if (channel.isRegistered()) {
                channel.close();
            } else {
                channel.unsafe().closeForcibly();
            }
        }

        return regFuture;
    }
然后下一句核心代码是ChannelFuture regFuture = this.config().group().register(channel);,签名我们的ServerSocketChannel已经创建完了,但是按照NIO的逻辑,Channel需要注册到Selector中与感兴趣的事件绑定,这句代码就在干这个事,我们进入该方法:
config返回ServerBootStrap对象,group返回EventLoopGroup对象(注意这个EventLoopGroup是bossGroup)
//注意前面group返回的事EventLoopGroup对象,所以这个register的实现就是`MultiThreadEventLoopGroup`
 public ChannelFuture register(Channel channel) {
        return this.next().register(channel);
    }
注意:上面源码本人忘记下载了,看的全是Class文件,但是代码的主体结构还是大差不差,可以对照着看
next方法就是获取下一个EventLoop对象,然后调用EventLoop对象的register方法:
//注意此时调用register方法的是`EventLoop`对象,所以register方法的实现是`SingleThreadEventLoopGroup`
  @Override
    public ChannelFuture register(Channel channel) {
        return register(new DefaultChannelPromise(channel, this));
    }
@Override
    public ChannelFuture register(final ChannelPromise promise) {
        ObjectUtil.checkNotNull(promise, "promise");
        promise.channel().unsafe().register(this, promise);
        return promise;
    }

@Override
        public final void register(EventLoop eventLoop, final ChannelPromise promise) {
            if (eventLoop == null) {
                throw new NullPointerException("eventLoop");
            }
            if (isRegistered()) {
                promise.setFailure(new IllegalStateException("registered to an event loop already"));
                return;
            }
            if (!isCompatible(eventLoop)) {
                promise.setFailure(
                        new IllegalStateException("incompatible event loop type: " + eventLoop.getClass().getName()));
                return;
            }

            AbstractChannel.this.eventLoop = eventLoop;
			//判断你传入的线程和当前的线程是否是一样
            if (eventLoop.inEventLoop()) {
            	//如果是一样,直接调用register0
                register0(promise);
            } else {
                try {
                	//否则使用你传入的线程来执行任务(这里就实现了异步调用)
                    eventLoop.execute(new Runnable() {
                        @Override
                        public void run() {
                            register0(promise);
                        }
                    });
                } catch (Throwable t) {
                    logger.warn(
                            "Force-closing a channel whose registration task was not accepted by an event loop: {}",
                            AbstractChannel.this, t);
                    closeForcibly();
                    closeFuture.setClosed();
                    safeSetFailure(promise, t);
                }
            }
        }
上面代码的核心部分是:
//判断你传入的线程和当前的线程是否是一样
            if (eventLoop.inEventLoop()) {
            	//如果是一样,直接调用register0
                register0(promise);
            } else {
                try {
                	//否则使用你传入的线程来执行任务(这里就实现了异步调用)
                    eventLoop.execute(new Runnable() {
                        @Override
                        public void run() {
                            register0(promise);
                        }
                    });
                }
netty异步调用逻辑的核心代码就在try语句块中,我们进入execute方法:
@Override
    public void execute(Runnable task) {
        if (task == null) {
            throw new NullPointerException("task");
        }
        boolean inEventLoop = inEventLoop();
        //将我们前面传的Runnable任务添加到了队列中
        addTask(task);
        if (!inEventLoop) {
            startThread();
            if (isShutdown()) {
                boolean reject = false;
                try {
                    if (removeTask(task)) {
                        reject = true;
                    }
                } catch (UnsupportedOperationException e) {
                    // The task queue does not support removal so the best thing we can do is to just move on and
                    // hope we will be able to pick-up the task before its completely terminated.
                    // In worst case we will log on termination.
                }
                if (reject) {
                    reject();
                }
            }
        }

        if (!addTaskWakesUp && wakesUpForTask(task)) {
            wakeup(inEventLoop);
        }
    }
上面代码的核心就是addTask(task);,它将前面传的Runnable任务添加到了队列中(EventLoop的TaskQueue)。
    protected void addTask(Runnable task) {
        if (task == null) {
            throw new NullPointerException("task");
        }
        if (!offerTask(task)) {
            reject(task);
        }
    }

    final boolean offerTask(Runnable task) {
        if (isShutdown()) {
            reject();
        }
        return taskQueue.offer(task);
    }
回到execute方法,将任务丢到队列后,下面就调用 startThread();,启动线程了,我们进入该方法:
    private void startThread() {
        if (state == ST_NOT_STARTED) {
            if (STATE_UPDATER.compareAndSet(this, ST_NOT_STARTED, ST_STARTED)) {
                boolean success = false;
                try {
                    doStartThread();
                    success = true;
                } finally {
                    if (!success) {
                        STATE_UPDATER.compareAndSet(this, ST_STARTED, ST_NOT_STARTED);
                    }
                }
            }
        }
    }


private void doStartThread() {
        assert thread == null;
        //executor就是在创建EventLoopGroup时候创建的那个单线程线程池
        executor.execute(new Runnable() {
            @Override
            public void run() {
                thread = Thread.currentThread();
                if (interrupted) {
                    thread.interrupt();
                }

                boolean success = false;
                updateLastExecutionTime();
                try {
                    SingleThreadEventExecutor.this.run();
                    success = true;
                } catch (Throwable t) {
                    logger.warn("Unexpected exception from an event executor: ", t);
                } finally {
                    for (;;) {
                        int oldState = state;
                        if (oldState >= ST_SHUTTING_DOWN || STATE_UPDATER.compareAndSet(
                                SingleThreadEventExecutor.this, oldState, ST_SHUTTING_DOWN)) {
                            break;
                        }
                    }

                    // Check if confirmShutdown() was called at the end of the loop.
                    if (success && gracefulShutdownStartTime == 0) {
                        if (logger.isErrorEnabled()) {
                            logger.error("Buggy " + EventExecutor.class.getSimpleName() + " implementation; " +
                                    SingleThreadEventExecutor.class.getSimpleName() + ".confirmShutdown() must " +
                                    "be called before run() implementation terminates.");
                        }
                    }

                    try {
                        // Run all remaining tasks and shutdown hooks.
                        for (;;) {
                            if (confirmShutdown()) {
                                break;
                            }
                        }
                    } finally {
                        try {
                            cleanup();
                        } finally {
                            // Lets remove all FastThreadLocals for the Thread as we are about to terminate and notify
                            // the future. The user may block on the future and once it unblocks the JVM may terminate
                            // and start unloading classes.
                            // See https://github.com/netty/netty/issues/6596.
                            FastThreadLocal.removeAll();

                            STATE_UPDATER.set(SingleThreadEventExecutor.this, ST_TERMINATED);
                            threadLock.countDown();
                            if (logger.isWarnEnabled() && !taskQueue.isEmpty()) {
                                logger.warn("An event executor terminated with " +
                                        "non-empty task queue (" + taskQueue.size() + ')');
                            }
                            terminationFuture.setSuccess(null);
                        }
                    }
                }
            }
        });
    }
我们进入核心代码 SingleThreadEventExecutor.this.run();:
@Override
    protected void run() {
       //死循环
        for (;;) {
            try {
                try {
                    switch (selectStrategy.calculateStrategy(selectNowSupplier, hasTasks())) {
                    case SelectStrategy.CONTINUE:
                        continue;

                    case SelectStrategy.BUSY_WAIT:
                        // fall-through to SELECT since the busy-wait is not supported with NIO

                    case SelectStrategy.SELECT:
                        select(wakenUp.getAndSet(false));


                        if (wakenUp.get()) {
                            selector.wakeup();
                        }
                        // fall through
                    default:
                    }
                } catch (IOException e) {
                    // If we receive an IOException here its because the Selector is messed up. Let's rebuild
                    // the selector and retry. https://github.com/netty/netty/issues/8566
                    rebuildSelector0();
                    handleLoopException(e);
                    continue;
                }

                cancelledKeys = 0;
                needsToSelectAgain = false;
                final int ioRatio = this.ioRatio;
                if (ioRatio == 100) {
                    try {
                        processSelectedKeys();
                    } finally {
                        // Ensure we always run tasks.
                        runAllTasks();
                    }
                } else {
                    final long ioStartTime = System.nanoTime();
                    try {
                        processSelectedKeys();
                    } finally {
                        // Ensure we always run tasks.
                        final long ioTime = System.nanoTime() - ioStartTime;
                        runAllTasks(ioTime * (100 - ioRatio) / ioRatio);
                    }
                }
            } catch (Throwable t) {
                handleLoopException(t);
            }
            // Always handle shutdown even if the loop processing threw an exception.
            try {
                if (isShuttingDown()) {
                    closeAll();
                    if (confirmShutdown()) {
                        return;
                    }
                }
            } catch (Throwable t) {
                handleLoopException(t);
            }
        }
    }
上面代码的核心就是 select(wakenUp.getAndSet(false));方法,我们进入该方法:
private void select(boolean oldWakenUp) throws IOException {
		//获得了selector
        Selector selector = this.selector;
        try {
            int selectCnt = 0;
            long currentTimeNanos = System.nanoTime();
            long selectDeadLineNanos = currentTimeNanos + delayNanos(currentTimeNanos);

            long normalizedDeadlineNanos = selectDeadLineNanos - initialNanoTime();
            if (nextWakeupTime != normalizedDeadlineNanos) {
                nextWakeupTime = normalizedDeadlineNanos;
            }
            for (;;) {
                long timeoutMillis = (selectDeadLineNanos - currentTimeNanos + 500000L) / 1000000L;
                if (timeoutMillis <= 0) {
                    if (selectCnt == 0) {
                        selector.selectNow();
                        selectCnt = 1;
                    }
                    break;
                }

                // If a task was submitted when wakenUp value was true, the task didn't get a chance to call
                // Selector#wakeup. So we need to check task queue again before executing select operation.
                // If we don't, the task might be pended until select operation was timed out.
                // It might be pended until idle timeout if IdleStateHandler existed in pipeline.
                if (hasTasks() && wakenUp.compareAndSet(false, true)) {
                    selector.selectNow();
                    selectCnt = 1;
                    break;
                }

                int selectedKeys = selector.select(timeoutMillis);
                selectCnt ++;

                if (selectedKeys != 0 || oldWakenUp || wakenUp.get() || hasTasks() || hasScheduledTasks()) {
                    // - Selected something,
                    // - waken up by user, or
                    // - the task queue has a pending task.
                    // - a scheduled task is ready for processing
                    break;
                }
                if (Thread.interrupted()) {
                    // Thread was interrupted so reset selected keys and break so we not run into a busy loop.
                    // As this is most likely a bug in the handler of the user or it's client library we will
                    // also log it.
                    //
                    // See https://github.com/netty/netty/issues/2426
                    if (logger.isDebugEnabled()) {
                        logger.debug("Selector.select() returned prematurely because " +
                                "Thread.currentThread().interrupt() was called. Use " +
                                "NioEventLoop.shutdownGracefully() to shutdown the NioEventLoop.");
                    }
                    selectCnt = 1;
                    break;
                }

                long time = System.nanoTime();
                if (time - TimeUnit.MILLISECONDS.toNanos(timeoutMillis) >= currentTimeNanos) {
                    // timeoutMillis elapsed without anything selected.
                    selectCnt = 1;
                } else if (SELECTOR_AUTO_REBUILD_THRESHOLD > 0 &&
                        selectCnt >= SELECTOR_AUTO_REBUILD_THRESHOLD) {
                    // The code exists in an extra method to ensure the method is not too big to inline as this
                    // branch is not very likely to get hit very frequently.
                    selector = selectRebuildSelector(selectCnt);
                    selectCnt = 1;
                    break;
                }

                currentTimeNanos = time;
            }

            if (selectCnt > MIN_PREMATURE_SELECTOR_RETURNS) {
                if (logger.isDebugEnabled()) {
                    logger.debug("Selector.select() returned prematurely {} times in a row for Selector {}.",
                            selectCnt - 1, selector);
                }
            }
        } catch (CancelledKeyException e) {
            if (logger.isDebugEnabled()) {
                logger.debug(CancelledKeyException.class.getSimpleName() + " raised by a Selector {} - JDK bug?",
                        selector, e);
            }
            // Harmless exception - log anyway
        }
    }
上面代码的核心代码就是int selectedKeys = selector.select(timeoutMillis);,这里就调用了Selector的select方法,学习NIO后我们知道这个方法是一个阻塞方法,方法结果的返回值就是已经就绪的事件。这里设置了超时时间,到了超时时间不管有没有事件就绪,select方法就会执行完毕。上面代码核心就是调用了一个select方法,回到run方法:
if (ioRatio == 100) {
                    try {
                        processSelectedKeys();
                    } finally {
                        // Ensure we always run tasks.
                        runAllTasks();
                    }
                }
回到线程模型图,我们就回到了下面红圈部分:
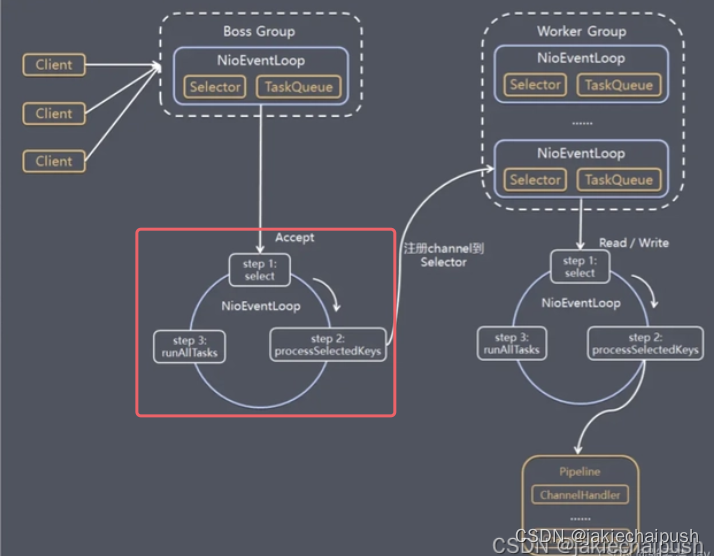
第二步就是调用processSelectedKeys()方法,我们进入该方法:
    private void processSelectedKeys() {
        if (selectedKeys != null) {
            processSelectedKeysOptimized();
        } else {
            processSelectedKeysPlain(selector.selectedKeys());
        }
    }
如果selectedKeys不为空,进入processSelectedKeysOptimized方法:
private void processSelectedKeysOptimized() {
        for (int i = 0; i < selectedKeys.size; ++i) {
            final SelectionKey k = selectedKeys.keys[i];
            // null out entry in the array to allow to have it GC'ed once the Channel close
            // See https://github.com/netty/netty/issues/2363
            selectedKeys.keys[i] = null;

            final Object a = k.attachment();

            if (a instanceof AbstractNioChannel) {
                processSelectedKey(k, (AbstractNioChannel) a);
            } else {
                @SuppressWarnings("unchecked")
                NioTask<SelectableChannel> task = (NioTask<SelectableChannel>) a;
                processSelectedKey(k, task);
            }

            if (needsToSelectAgain) {
                // null out entries in the array to allow to have it GC'ed once the Channel close
                // See https://github.com/netty/netty/issues/2363
                selectedKeys.reset(i + 1);

                selectAgain();
                i = -1;
            }
        }
    }
上面核心代码就是NIO代码的逻辑,这里就不详细分析了。回到run方法,下面就会调用runAllTasks()方法:
protected boolean runAllTasks() {
        assert inEventLoop();
        boolean fetchedAll;
        boolean ranAtLeastOne = false;

        do {
            fetchedAll = fetchFromScheduledTaskQueue();
            if (runAllTasksFrom(taskQueue)) {
                ranAtLeastOne = true;
            }
        } while (!fetchedAll); // keep on processing until we fetched all scheduled tasks.

        if (ranAtLeastOne) {
            lastExecutionTime = ScheduledFutureTask.nanoTime();
        }
        afterRunningAllTasks();
        return ranAtLeastOne;
    }
上面代码就是将EventLoop的TaskQueue中的任务拿出来执行。这里我们就得回到前面的register方法,因为在这里我们加入的一个任务会在runAllTasks方法中执行:
  eventLoop.execute(new Runnable() {
                        @Override
                        public void run() {
                            register0(promise);
                        }
                    });
我们进入register0方法:
private void register0(ChannelPromise promise) {
            try {
                // check if the channel is still open as it could be closed in the mean time when the register
                // call was outside of the eventLoop
                if (!promise.setUncancellable() || !ensureOpen(promise)) {
                    return;
                }
                boolean firstRegistration = neverRegistered;
                doRegister();
                neverRegistered = false;
                registered = true;

                // Ensure we call handlerAdded(...) before we actually notify the promise. This is needed as the
                // user may already fire events through the pipeline in the ChannelFutureListener.
                pipeline.invokeHandlerAddedIfNeeded();

                safeSetSuccess(promise);
                pipeline.fireChannelRegistered();
                // Only fire a channelActive if the channel has never been registered. This prevents firing
                // multiple channel actives if the channel is deregistered and re-registered.
                if (isActive()) {
                    if (firstRegistration) {
                        pipeline.fireChannelActive();
                    } else if (config().isAutoRead()) {
                        beginRead();
                    }
                }
            } catch (Throwable t) {
                // Close the channel directly to avoid FD leak.
                closeForcibly();
                closeFuture.setClosed();
                safeSetFailure(promise, t);
            }
        }
注意上面代码第一个十分核心的代码 doRegister();,我们进入该方法:
@Override
    protected void doRegister() throws Exception {
        boolean selected = false;
        for (;;) {
            try {
                selectionKey = javaChannel().register(eventLoop().unwrappedSelector(), 0, this);
                return;
            } catch (CancelledKeyException e) {
                if (!selected) {
                    // Force the Selector to select now as the "canceled" SelectionKey may still be
                    // cached and not removed because no Select.select(..) operation was called yet.
                    eventLoop().selectNow();
                    selected = true;
                } else {
                    // We forced a select operation on the selector before but the SelectionKey is still cached
                    // for whatever reason. JDK bug ?
                    throw e;
                }
            }
        }
    }
javaChannel()就是前面创建的ServerSocketChannel,然后调用register方法将ServerSocketChannel注册到了Selector中了,然后绑定了感兴趣的事件。这里也是NIO的逻辑。回到register0方法,下一个核心代码是:
 pipeline.invokeHandlerAddedIfNeeded();
                safeSetSuccess(promise);
                pipeline.fireChannelRegistered();
                // Only fire a channelActive if the channel has never been registered. This prevents firing
                // multiple channel actives if the channel is deregistered and re-registered.
                if (isActive()) {
                    if (firstRegistration) {
                        pipeline.fireChannelActive();
                    } else if (config().isAutoRead()) {
                        beginRead();
                    }
                }
invokeHandlerAddedIfNeeded();这里底层源码比较复杂,它底层其实会调用我们之前在初始化pipeLine的时候加入的一个handler:
p.addLast(new ChannelHandler[]{new ChannelInitializer<Channel>() {
            public void initChannel(final Channel ch) {
                final ChannelPipeline pipeline = ch.pipeline();
                ChannelHandler handler = ServerBootstrap.this.config.handler();
                if (handler != null) {
                    pipeline.addLast(new ChannelHandler[]{handler});
                }

                ch.eventLoop().execute(new Runnable() {
                    public void run() {
                        pipeline.addLast(new ChannelHandler[]{new ServerBootstrapAcceptor(ch, currentChildGroup, currentChildHandler, currentChildOptions, currentChildAttrs)});
                    }
                });
            }
        }});
执行了上面的代码PipeLine里面的handler的情况变化如下:
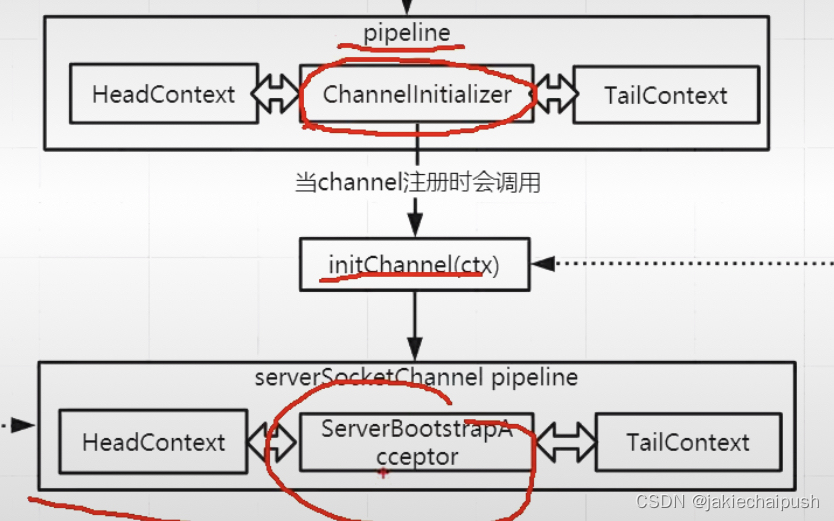
继续执行下面代码:
pipeline.fireChannelRegistered();

	//head就是前面双向链表的头节点
  @Override
    public final ChannelPipeline fireChannelRegistered() {
        AbstractChannelHandlerContext.invokeChannelRegistered(head);
        return this;
    }

 static void invokeChannelRegistered(final AbstractChannelHandlerContext next) {
        EventExecutor executor = next.executor();
        if (executor.inEventLoop()) {
        //同步方式调用
            next.invokeChannelRegistered();
        } else {
        //异步方式调用
            executor.execute(new Runnable() {
                @Override
                public void run() {
                    next.invokeChannelRegistered();
                }
            });
        }
    }

private void invokeChannelRegistered() {
        if (invokeHandler()) {
            try {
                ((ChannelInboundHandler) handler()).channelRegistered(this);
            } catch (Throwable t) {
                notifyHandlerException(t);
            }
        } else {
            fireChannelRegistered();
        }
    }

//AbstractRemoteAddressFilter
  @Override
    public void channelRegistered(ChannelHandlerContext ctx) throws Exception {
        handleNewChannel(ctx);
       ctx.fireChannelRegistered();
    }
((ChannelInboundHandler) handler()).channelRegistered(this);就调用了handler的channelRegistered方法,然后ctx.fireChannelRegistered();就是调用pipeline中下一个handler的核心逻辑。
上面就介绍了ServerBootStrap启动的核心逻辑。